
Prefiltered cubemaps are widely used in games. The idea is to match cubemap blurriness at each mip to appearance of the BRDF you use.
It’s all started with Modified Cubemapgen
Then there’s also cmft which is quite faster
Finally there’s Lys
All these tools are separate utilities which also have a command-line support (except Lys).
Sometimes you want to filter the cubemap in engine, without exporting stuff/running separate utils and you want it to be fast. Cubemapgen may take minutes to filter, cmft is much better here, but sometimes you still need more control and performance. Sometimes you also have to filter it in something like WebGL, where running separate utils isn’t very acceptable (yes, there is Emscripten, but the resulting code is often too fat).
At first I thought that this is a very slow and complicated process (why otherwise cubemapgen does it sooo slow?) and was quite afraid of implementing it myself, but turns out, it’s not THAT hard.
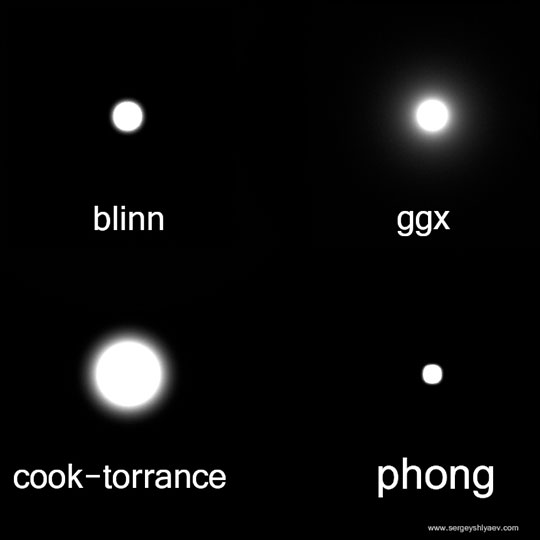
Here’s the result:

You may notice some blurred seam appearance on the rightmost sphere in all versions – this is the inevitable consequence of using the seamless cubemap filtering trick on a DX9-level GAPI. DX10+ doesn’t have this problem and looks smoother. For WebGL implementation I had to support DX9, because latest Firefox still uses it to emulate WebGL (Chrome and IE11 render through DX11).
As you can see, Blinn-Phong importance sampled version looks extremely close to cubemapgen offline output. This version takes around 1.5 sec on GTX560 to compute from 128×128 source cubemap. “Simple” version takes even less than 1 sec.
So, how it is done?
We don’t just blur the cubemap. We imagine a sphere, reflecting it and associate each mip with different roughness value. Rougher surfaces have more noisy microfacets reflecting light in many directions at each visible point. The rougher the surface, the wider will be the cone of incoming light:

So what we should do is to average this cone of lighting.
The simple averaging is not enough though – there is also a complicated weight factor depending on deviation from the original normal based on many factors. This factor actually makes your BRDF to have the falloff it has, instead of just being an averaged circle.
So what, do you have to cast a million rays and then multiply each by a weight? No.
Importance sampling is a technique, the idea of which is to just generate the rays with density depending on your BRDF’s shape. Usually you’ll end up having more rays with direction similar to the surface normal and less deviating rays. Simply averaging the lighting from each ray will naturally give you more intensity near the center, because there were more rays there.
Here’s a difference between “Simple” version (top), which uses simple cosine-weighted distribution of rays and Blinn-Phong version (bottom):

As you can see, getting the correct ray distribution can be important for getting nice highlight falloff instead of just circular spots.
The Blinn-Phong is, of course, not ideal and quite old. GGX is considered more realistic, but I haven’t used it yet.
Different BRDF have different requirements for the ray count. That’s the point of having a “Simple” version – despite of having less correct highlights, it requires MUCH less rays for an artifact-free result (because it’s more uniform).
So the basic algorithm is:
– generate uniformly random directions on the hemisphere;
– focus the directions depending on your BRDF intensity-direction relation at given roughness;
– render lower mip cubemap faces, while reading higher mip data;
– for each direction
–{
—transform the direction to be relative to the original lookup vector;
—light += texCUBE(higher mip, transformed direction)
–}
–light /= numDirs;
You don’t have to pre-generate the directions though – all this can be done in shader sufficiently fast.
Here is a good read on generating points on the hemisphere. It even has an interactive demo.
The Hammersley method relies on bitwise operations though, which are not always accessible (not in WebGL/DX9). In such old-school GAPIs you have to either precompute the directions, or use some other way to generate random numbers. There are many other ways, one you can see in my source code, others on ShaderToy or somewhere else. Such randoms will likely be less uniform.
Ideally, when writing each mip, you should probably read the highest available mip with different cones of rays, but it’s not very fast, and you’ll get some significant aliasing trying to sample a high resolution cubemap with a very wide cone of limited rays.
Instead, it is actually quite sufficient to read just a 2x larger mip. This larger mip must resemble the highest mip as much as possible, so something simple like automatic mipmap generation (bilinear downsample) will do. Note, that you must NOT cone-sample the mip that was already cone-sampled, because you’ll get noticeable over-blurring.
My version of filtering is now in the PlayCanvas engine repository, and it’s open source.
Sadly, there’s a bug in ANGLE, which prevents us from using it on Win Chrome/FF, ironically only IE11 works correctly.
The source in here:
https://github.com/playcanvas/engine/blob/28100541996a74112b8d8cda4e0b653076e255a2/src/graphics/graphics_prefiltercubemap.js
https://github.com/playcanvas/engine/blob/28100541996a74112b8d8cda4e0b653076e255a2/src/graphics/programlib/chunks/prefilterCubemap.ps
The latest version with additional bells and whistles will be always here:
https://github.com/playcanvas/engine/tree/master/src/graphics
